Contents
- Safety Warnings
- Symptoms of a Bad or Failing Capacitor
- What Does a Capacitor Actually Do?
- Types of A/C Capacitors
- What Is a Capacitor Rating?
- How to Tell if the Capacitor Is Bad
- Will the Air Conditioner Run with a Bad Capacitor?
- How to Test a Run Capacitor with a Multimeter
- How to Replace an Air Conditioner Capacitor
- A/C Capacitor Replacement Made Easy
We all know that amazing feeling of coming in from a hot summer day into your beautiful air-conditioned home. But, one day, you may go in and find that your home isn't as cool as you expect.
AC capacitors play a vital role in maintaining proper operation of air conditioning systems. If they fail, however, they can cause serious damage to the system. This article explains how to diagnose, test, and replace a bad capacitor.
How would you go about diagnosing, testing, and replacing a bad capacitor? What tools should you use?
With summers getting hotter and June 2021 smashing records, you need working AC.
Before you go out and get some drastic work done, you may need to ask yourself the question, "Do I have a bad AC capacitor?". If you do, there's good news - you can replace it yourself.
Check out the symptoms of a bad AC capacitor and replacement guide to see if this is you.
Safety Warnings
Many AC units have capacitors that carry quite a high charge, so you should absolutely be careful when replacing or inspecting them. However, if you take reasonable precautions, you should have no problems.
- Never touch terminals on the end of a capacitor
- Don't use something with a metal handle to discharge the load on the capacitor. Use a screwdriver with an insulated handle and apply the metal shaft of the screwdriver to C to HERM and C to FAN to discharge the capacitor.
When working with high voltage equipment like an AC unit, always make sure it's off. If your AC unit is a plug-in type, make sure the plug is completely out. If your AC is connected to a breaker, make sure that the breaker is disconnected or down.
Symptoms of a Bad or Failing Capacitor
AC units that have bad capacitors can throw up several interesting symptoms. Though it's not always a one hundred percent guarantee of a bad AC capacitor, the chances are good that you have a problem if you see any of these.
The first symptom you'll notice is that your condenser fan motor or compressor won't start. You might also notice noises coming from the condenser unit.
If you're noticing any of these symptoms, then it could mean that your AC has a bad capacitor.
Common Symptoms of a Bad Capacitor:
- Humming noises
- Problems with turning on or off
- Burning or electrical discharge smell
- Higher than normal bills
- The unit may randomly shut off
- No cooling
- Clicking or humming noises
If any of that sounds familiar, there's a good chance that there's something wrong with your AC capacitor, and you should consider replacing it.
If none of these symptoms fit, take a look at our troubleshooting guide to find the problem.
No Cooling
Once your AC stops blowing cold air, it's a sure sign that something is wrong. It's possible that this isn't a long-term problem. You can test by turning your unit on and off again to see if the problem goes away.
Clicking or Humming Noises
This one is related to the motor again. When the motor tries to start but cannot, it may make a clicking or humming noise. This is a good sign that the capacitor is broken.
Now that you have a good idea of the symptoms you might see, let's learn a bit about how capacitors operate. That way, you can understand how to replace them safely and efficiently.
High Energy Bills
When an AC capacitor is bad, the condenser fan motor has to work harder and will draw more amps. So when you suddenly notice your energy bill going up, you may have a bad capacitor. To understand why a bad capacitor means a higher energy bill, see our section below on what a capacitor does.
Random Shutoffs
You might find that your AC unit switches itself off without you doing anything from time to time.
Problem with Turning On or Off
This problem is almost always because of a bad capacitor. When the system is trying to do something that needs more energy, a bad capacitor can cause issues. This symptom might also show up as the unit taking a long time to start working after you turn it on. The capacitor gives the initial jolt of energy, and when it fails, the AC unit struggles to start. A common workaround, albeit sometimes dangerous is to give the fan blade a jump start with a stick. This can be dangerous and cause damage to the unit, so should only be done in the case of an emergency.
Burning or Electrical Discharge Smell
This one is a little more complicated as there may be many reasons (none of them good) why your AC unit might smell of burning. In your AC unit, the capacitor drives a motor. When the capacitor is bad, the motor tends to overheat, and this can cause the smell.
What Does a Capacitor Actually Do?
If you think about a capacitor as a large store for energy, you're on the right track. The simplest capacitor has only a few components. These are two conductors that allow electricity to flow and gaps that block the flow of electricity. When electricity is run through the capacitor, electrons are stored in the two conductors. One conductor stores negatively charged electrons, and one stores positively charged electrons.
Any large appliance like an AC unit requires a lot of electricity to run. And, when the compressor and fan motor are starting up, they need a large amount of energy. You wouldn't want to pay top rates for your electricity all the time - this is where capacitors come in.
Capacitors use the stored energy to give a big jolt of power to your compressor and fan motor when it starts up. You may have heard the noise when this process starts.
Once the unit has started up, the capacitor isn't needed as much, and it can go back to storing up energy for the next big push.
Types of A/C Capacitors
Dual Run Capacitor
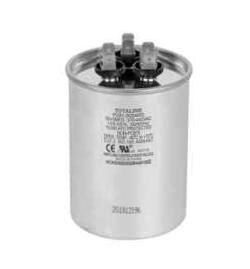
A/C's with PSC fan motors, and non-variable compressors will always have at least 1 capacitor. This is the dual run capacitor, and is actually two capacitors in one package- one to drive the compressor and one for the fan motor. You will notice 3 terminals on the capacitor with the following labels.
Dual Run Capacitor Terminal Label Meanings
C
The "C" designation on a capacitor means Common. This connects to the contactor and is the source of incoming power. This terminal will usually have 4 tines for spade connections.
FAN
The terminal labeled "FAN" connects the condenser fan motor. This will usually be the smaller MFD rating on a dual run capacitor. This terminal will usually have 2 tines for spade connections.
HERM or COMP
The terminal labeled "HERM" connects to the compressor. The term "HERM" is an abbreviation for "Hermetically-sealed Compressor". This will usually be the higher MFD rating on a dual run capacitor. This terminal will usually have 3 tines for spade connections. Sometimes, this terminal will be labeled "COMP", which is short for "Compressor."
Why Does My A/C have 2 or 3 Capacitors?
Some A/C's will be equipped with a start capacitor (usually in a plastic shell) and a run capacitor (metal casing). A common field modification in the event that a technician does not have a dual run capacitor to replace one that's failed is to split them into two capacitors. Say you have a 35+5MFD run capacitor, but the technician does not have that on their truck stock, they can elect to replace the capacitor with a 35MFD compressor run capacitor and a 5 MFD fan run capacitor.
If this modification was done, and your A/C was equipped with a start capacitor, you can have a condenser unit with 3 capacitors!
Start Capacitor
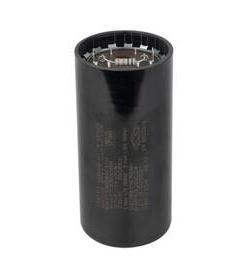
Some A/C's are equipped with a capacitor that has a black plastic shell and two terminals with a resistor soldered between them. This is a start capacitor; A start capacitor holds a significant charge, and helps to get the compressor or motor moving by giving a voltage boost during start-up.
Once the motor has started, the start capacitor needs to drop out of the circuit to prevent compressor/motor damage. This is done in 3 different ways.
- PRD (Potential Relay Device) - Most commonly found on aftermarket Supco hard-start kits, a PRD uses coltage or current sensing to drop the start capacitor from the circuit.
- PTC (Positive Temperature Coefficient) - A resistor in line that senses an overcurrent condition and increases its resistance to where no current will pass, effectively dropping the start capacitor out of the circuit.
- Centrifugal Switch - Will be found on the motor and when it reaches desired RPM, will open and release the capacitor from the circuit.
What is the difference between a start capacitor and a run capacitor?
Essentially, a start capacitor helps to start the motor, by giving a voltage boost during start up. A run capacitor keeps a motor running by inducing a phase shift in the stators to help the rotor "grab" the next stator and turn. When a run capacitor goes bad, this phase shift does not occur and causes the motor to work harder, and in turn, overheat and destroy the bearings.
What Is a Capacitor Rating?
A capacitor has many different ratings, but for our purposes, we only care about two:
- Working Voltage
- Capacitance Value. There will be 2 capacitance values on your AC capacitor. One drives the compressor, one drives the fan motor.
Working Voltage
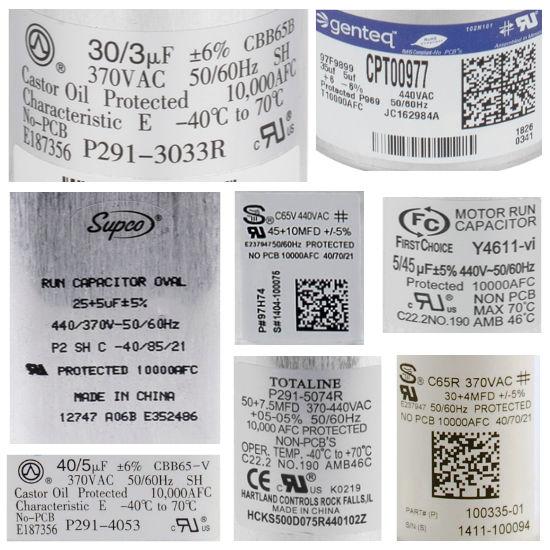
This is really just an indicator of how much voltage can pass through the capacitor. One of the reasons a capacitor may break down faster than expected is if you have inconsistent power in your home. When replacing a capacitor, you can go higher in voltage as this rating is simply the max voltage it can handle. Typically, you will see 370v or 440v capacitors, but many manufacturers have been consolidating stock to 440v only.
Capacitance Value
Measured in microfarads, this shows how much energy a capacitor can store. Typically this will be written 50+5 MFD or 50+5 μ. There are some other complications around this, but you should be fine if you can quote the microfarads.
How to Tell if You Have a Bad A/C Capacitor
The most common symptom of a bad capacitor is humming from the condenser fan motor on the outside unit, or the motor will not start. In the home, you will notice that cold air is not coming from the vents. When this happens, the capacitor is not functioning and cannot deliver enough stored energy to run the fan motor or compressor.
Besides all the symptoms in our list, there may be visual signs that there's something wrong with your capacitor. If you can see the capacitor on your AC unit, it's easy enough to inspect for damage or other functional problems.
Visual Indications of a Bad Capacitor
Take a close look at the capacitor in your unit. Does it look smooth and unblemished? If there is any noticeable bowing or bulging, the capacitor needs to be replaced. In the same way, if there is oil coming from the top of the capacitor, it's reached the end of its useful life and needs to be replaced.
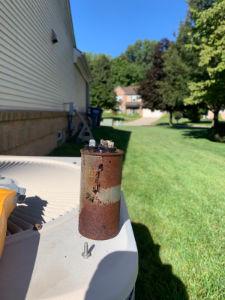
My Capacitor Looks Fine? Take a Closer Look
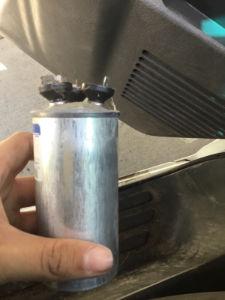
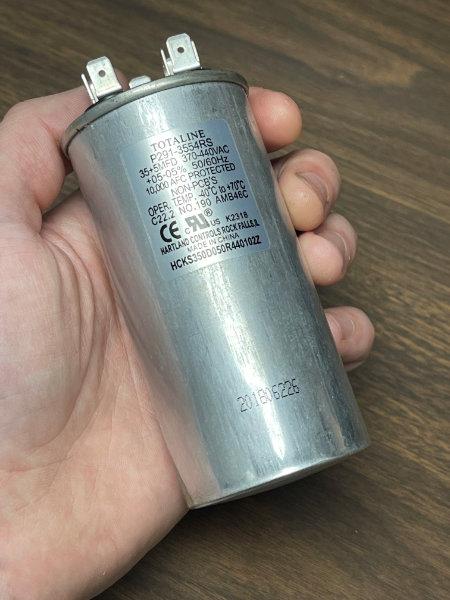
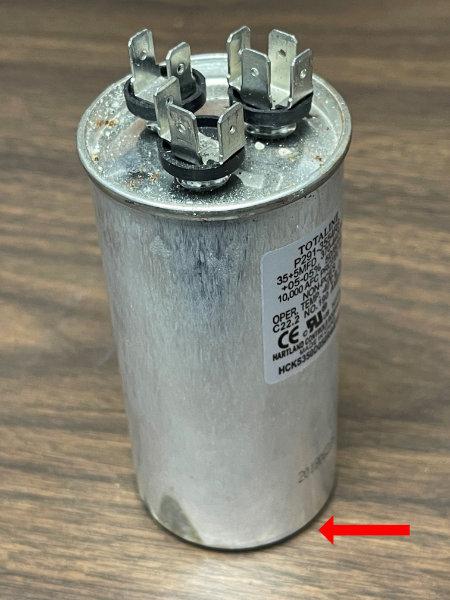
Below is a dual run capacitor I took from my home's unit. My condenser unit was singing the tell-tale tune, a motor humming, or some would call it a buzzing sound. After removing the disconnect fuses, I removed the capacitor from the unit, and at first, it appears that the capacitor looks almost brand new. Upon closer inspection, however, it is slightly bulged out.
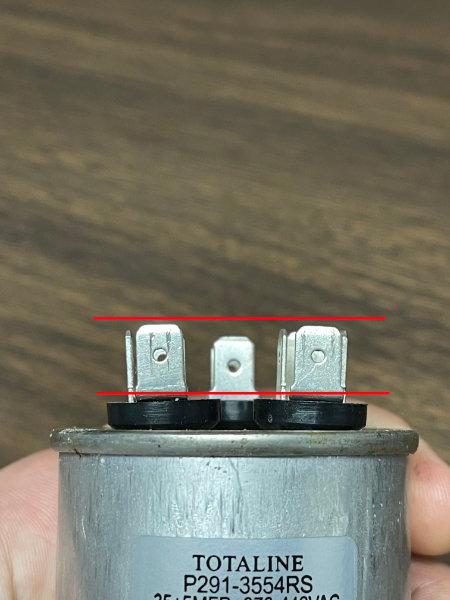
The easiest way to tell if it is indeed bulged out, it to set it on a flat surface and see if it rocks back and forth. Also, you should notice the edges of the bottom of the can are not setting flat on the surface. Another sign that gave this away was looking at the tines on the capacitor and noticing that they were not straight relative to each other.
Will the Air Conditioner Run with a Bad Capacitor?
You will likely hear a humming sound if the AC capacitor is bad and your AC will not run. In an emergency situation, the AC condenser fan motor can be jump started with a stick until a replacement capacitor arrives, however we advise against this as you can cause further damage to the fan blade and/or condenser coil. If the condenser coil is damaged, then a complete unit replacement may be needed as the cost of repair will be too costly.
How to Test a Run Capacitor with a Multimeter
Using The Capacitance Function on a Multimeter
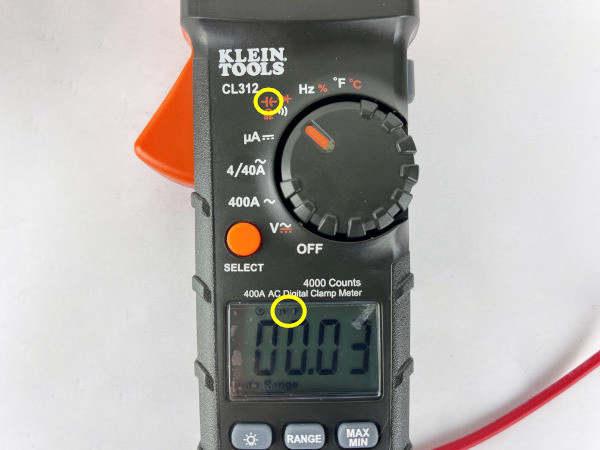
Turn on the meter
Turn dial to the capacitance function.(see below). In this case, we are using a Klein multimeter, and we have to press select until we see that it is capacitance mode.
Testing the Condenser Fan Section of the Capacitor
Put one multimeter probe on C (common)
Put the other probe on FAN.
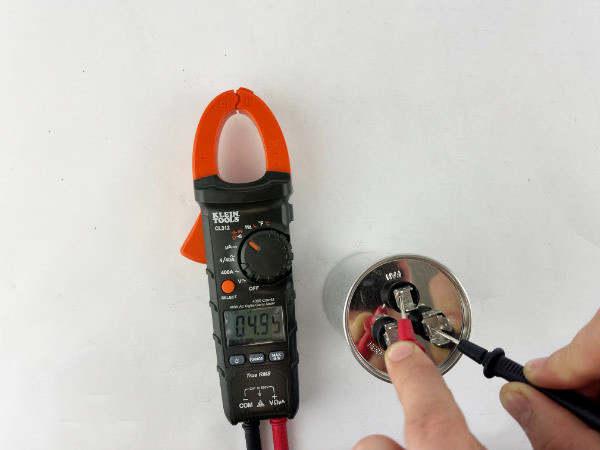
Wait a few seconds and you should see the capacitance reading on the display. A good reading will have the microfarads within 10% of the labeled specification.
Testing the Compressor Fan Section of the Capacitor
Put one multimeter probe on C (common)
Put the other probe on HERM. (HERM is short for hermetic which refers to the hermetically-sealed compressor)
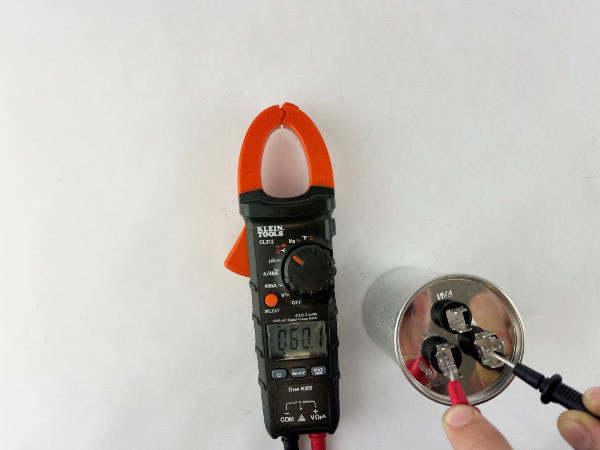
Wait a few seconds and you should see the capacitance reading on the display. A good reading will have the microfarads within 10% of the labeled specification.
Using The Resistance (Ohms) Function on a Multimeter
A capacitor can also be tested by measuring resistance, but this works best with an analog meter. Digital meters typically don't show the jump up and back down in ohms which indicates a good capacitor.
Turn on the meter
Turn the dial to Ohms. (Looks like the omega symbol)
Before You Start: Discharge the Capacitor
When reading ohms, the multimeter will charge the capacitor slightly, so you can't get an ohm reading. Discharge the capacitor by placing a screwdriver in between C and Fan and then C and HERM. After this, you are ready to test the capacitor using the resistance function on your multimeter.
Get a Quick Ohm Reading Between the Terminals
Put on probe on C and the other on FAN. You should see the ohm reading on the needle jump and come back down to infinity ohms
Reverse the probes and look for the same behavior in the multimeter needle.
Repeat this for C and HERM.
Get an Ohm Reading Between the Terminals and the Casing of the Capacitor
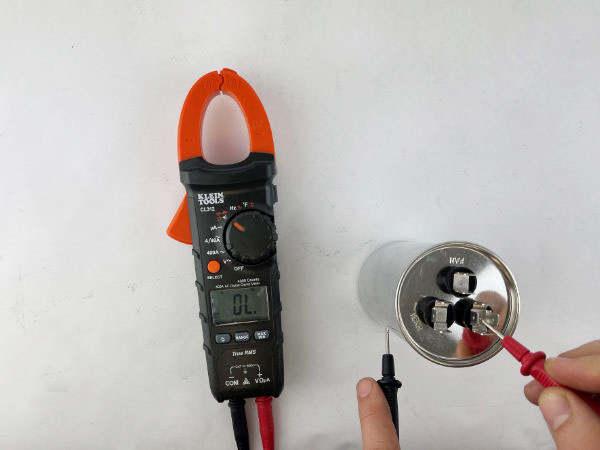
Put one probe on C and the other on the outer metal casing of the capacitor. If you get a reading, indicating continuity, then the capacitor is bad.
Repeat this for the FAN terminal and the HERM terminal
How to Replace an Air Conditioner Capacitor
AC capacitor replacement isn't difficult and can be DIY in most models. Each model differs, so there might be a slightly different process depending on your make.
The basic steps are:
- Turn off the breaker and unplug your AC unit's disconnect switch (mounted near condenser)
- Open or remove the panel that gives you access
- This is usually found on the side of the unit and is marked
- Check what the broken capacitor's rating is
- Take off the old capacitor
- Install the new capacitor
- Turn on the AC unit and give it a test
Although this is a relatively simple installation, we suggest reading to the end of the instructions. You will have a complete understanding of what you'll be doing this way.
Step 1: Gather Your Tools
Do you need a screwdriver to remove your access panel? When you get to the capacitor removal, you may need both a 1/4 inch screwdriver and a 5/16th driver.
Step 2: Turn off and Unplug Your AC Unit
Make sure that you have turned off your AC unit properly. We recommend turning off the breaker that goes to the AC and remove the fuse block from the A/C disconnect box near the condenser.
Step 3: Open or Remove the Access Panel
This should look like a small, hinged door. It usually appears on the side or underside of an AC unit. Some panels require a screwdriver to open, while others have a latch. Be careful when opening the panel that you have a safe place to store it if it comes out entirely.
Step 4: Locate The Capacitor
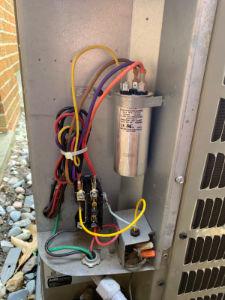
The capacitor in your AC unit will look like a metal cylinder. It will have either two or three terminals on the top and should have wires connected to it.
Step 5: Inspect the Capacitor
Do a quick visual inspection of the capacitor. Can you see any bulging? Is there any oil leaking down the sides? If anything looks deformed or strange about the capacitor, it's probably bad.
This is also a good time to inspect the rest of the components in the AC cabinet. Does the contactor show signs of burn marks or pitting? Is the plug on the compressor in good condition?
Step 6: Discharge the Capacitor
Before removing the wires from the capacitor, use a screwdriver with an insulated handle and apply the metal shaft of the screwdriver to C to HERM and then C to FAN to discharge the capacitor. Do not use a a screwdriver with a metal handle.
Step 7: Check Capacitor Rating
Take a close look at the capacitor. Here's an example that shows the label. It should have a label on the side that will tell you everything you need to know about it. Additionally, by providing your model and serial number to us, we can help you find the correct capacitor for your air conditioner. Remember, from what we saw above; we are interested in two ratings:
- Working Voltage
- Capacitance
Working Voltage Rating
This will usually be printed near the top of the label and have the letters VAC after it. You might see text similar to "370VAC" or "440VAC".
Capacitance Rating
This will usually be printed underneath the Voltage rating and will have the letters uF or µF after it. You might see text similar to "50uF" or "40+5MFD".
Step 8: Take off the Old Capacitor
First, take a picture of the old capacitor in place. This will help you later when you put in the new one. There should be three connectors - HERM, fan, and C. It's essential that when you put your new capacitor back in, you connect it in the same way.
SAFETY WARNING: Do not touch the terminals on the capacitor as it may still hold a charge.
Once you have taken a photo of the connectors, carefully disconnect them. Any disconnected wires should be put aside where they won't get in the way.
The capacitor should be simple to remove. They usually only need one or two screws to be removed, and some are snap types. If screws are holding the capacitor in, make sure you keep them somewhere safe.
Step 9: Install the New Capacitor
One by one, attach the wires as they were on the old capacitor. Make sure that the correct wires are going to HERM, fan, and C connectors. Double-check that you have them right before proceeding.
WARNING: To prevent damage to the compressor or fan motor, double check that you have connected the wires to the correct terminal. If you connect the fan terminal to the compressor, it may not start, or even worse, start, but heat up and burn up the compressor over time.
Once you are sure that you have the suitable connectors in the right place, it's time to mount the capacitor again. Take the screws you removed previously and install the capacitor using solid pressure. Be careful not to strip the screws when installing.
If the capacitor does not use screws to install, it should simply snap into place again.
Step 10: Close and Secure the Access Panel
Don't forget to put back any screws that might have been holding the door closed. An open access panel could be dangerous and should be properly closed.
Step 11: Turn on the AC Unit and Test
It's time to bring everything back up again. Turn your breaker back to the on position in the breaker panel. Reinsert the fuseblock in your A/C disconnect.
Once everything is back in place, you can turn your AC unit on as usual and see if it operates.
Step 12: Testing
Testing is as simple as turning on the AC unit and setting it to cool.
You should not hear any humming or clicking, and the compressor and the fan motor should start easily. If these two components are still struggling to start, they may have been permanently damaged from the failing capacitor that was just replaced.
You should see a marked difference. Everything should now be working properly, and your room should begin to cool down.
Get the Repair Parts You Need
A/C Capacitor Replacement Made Easy
So, now that you've gained this new ability to fix your own AC unit, what else is left? Well, for a start, you need a good, reliable place to replace your bad AC capacitor.
Fortunately, that's really easy. You can contact our parts people or call us direct to talk to a friendly technician. We will help you determine which capacitor you need based on your make and model or the capacitor rating. We stock all kinds of replacement capacitors, so we're always ready to ship them out to you.
And remember, if you ever need anything else related to your air conditioner, don't hesitate to give us a call!
Related Articles
- The Nitty-Gritty DIY Air Conditioner Maintenance Checklist
- Why is my A/C Blowing Hot Air and How to Fix It (A/C Troubleshooting Guide)
About the Author

James Clark is the Ecommerce Manager of TechnicalHotandColdParts.com and HVAC Controls Specialist (certified in Tridium and Carrier i-Vu controls) with a decade of experience at Technical Hot & Cold. His extensive background includes service calls, installations, and providing technical support to parts customers. James has been featured in the Washington Post and continues to share his knowledge, helping homeowners navigate HVAC repairs. In his spare time, he's playing music with his children and spending too much time working on his lawn.

